Mohawk RevWood Premier Installation Guide
Click here to download this guide as a PDF, and click here to browse our RevWood Premier laminate products.
RevWood Premier Installation Guide
Job Site / Emplacement
Site Requirements
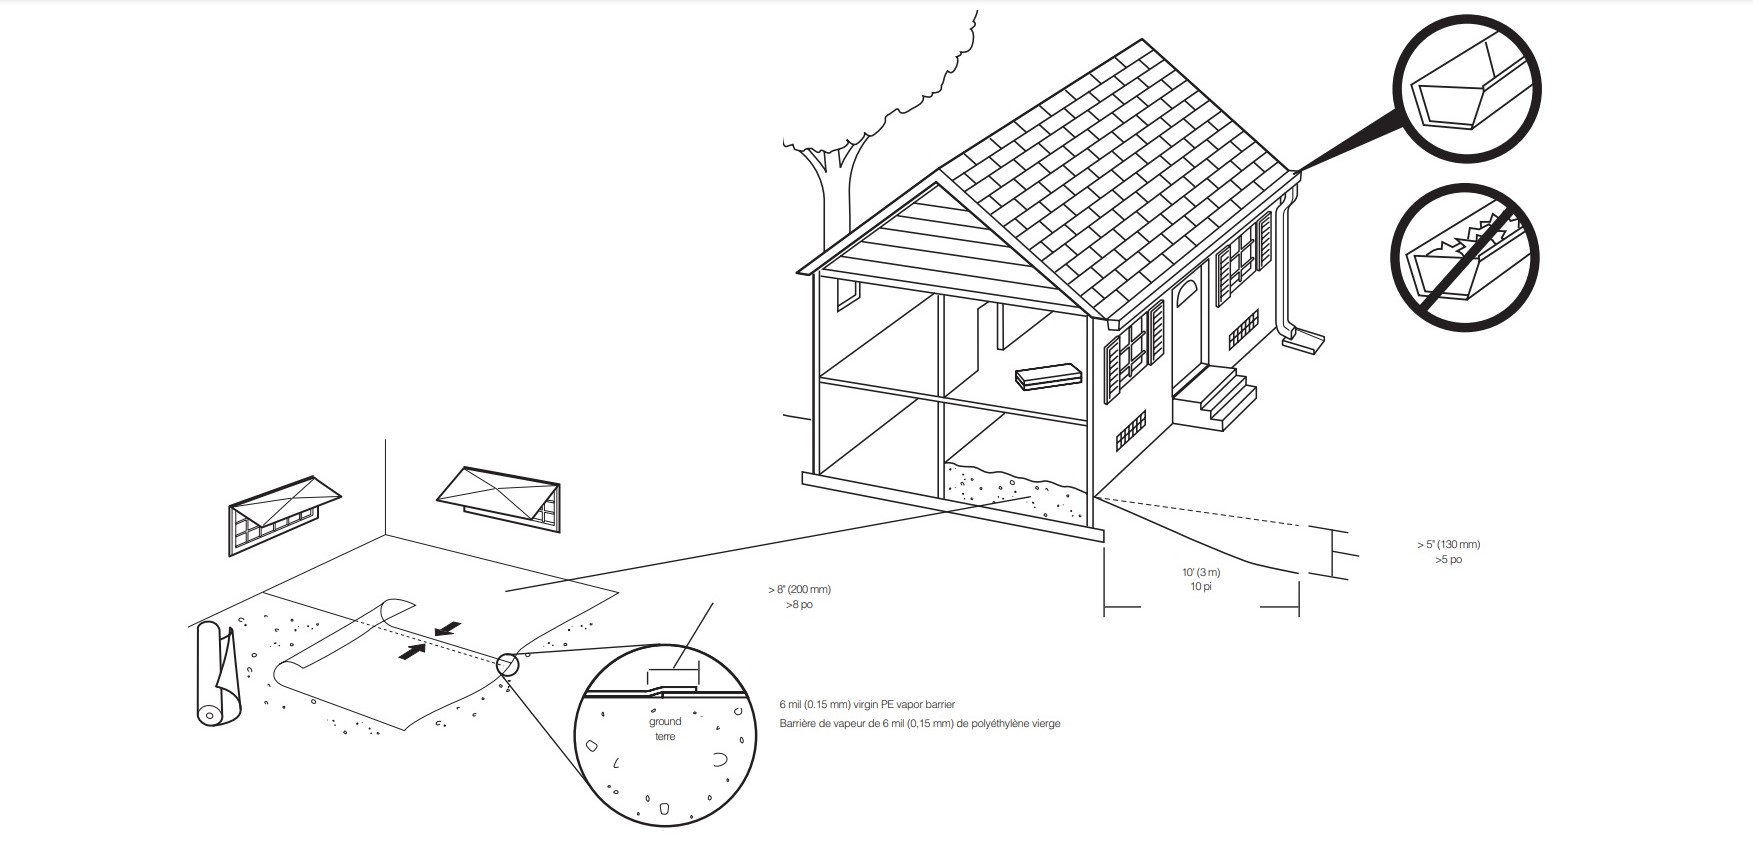
RevWood Premier™ is a durable floor covering, not intended as structural material. RevWood Premier requires a clean, dry, secure subfloor that meets building codes. The following requirements are not intended to supersede federal, state or local building codes, but as with many other interior finish products, may require modifying existing structural components for successful installation. Owner assumes responsibility for compliance with all building codes. RevWood Premier flooring is suitable for use in continuously climate controlled (35-65% RH and 60-85° F) indoor installations only and should not be installed over any floor with a sump pump or in a room with a floor drain. RevWood Premier flooring can be installed above, on or below grade. A moisture test is strongly recommended to determine if high moisture exists in the subfloor. When using a calcium chloride moisture test for concrete subfloors (ASTM F1869), values must be ≤ 5 lbs./1000ft²/24-hr or <80% RH with an in-situ probe (ASTM F2170). Moisture readings of wood subfloors must be ≤ 12%.
Acceptable job site conditions, including relative humidity and subfloor moisture conditions, must be maintained throughout the lifetime of the flooring. RevWood Premier flooring is installed as a floating floor and requires the use of T-moldings in doorways less than 32-inches (0.81m) or if the installation changes directions through the doorway (regardless of doorway size) and in rooms 50 feet (15,24m) or larger in length or width. Floor movement must not be constrained by glue, nails, screws, hardware or other fixed obstructions.
This product must be installed in accordance with installation instructions outlined in this document.
Exigences relatives à l’emplacement
RevWood Premier™ est un revêtement de sol durable et n’est pas conçu pour être un matériau structural. RevWood Premier nécessite un sous-plancher propre, sec et solide qui répond au code du bâtiment. Les recommandations suivantes ne remplacent pas les codes du bâtiment fédéraux, provinciaux ou locaux en vigueur. Comme pour tout produit de finition intérieure, la modification d’éléments structuraux existants peut être nécessaire pour réussir l’installation. Le propriétaire est responsable de la conformité à tous les codes du bâtiment. Le revêtement de RevWood Premier est conçu uniquement pour les installations à l’intérieur où la température est contrôlée (35 à 65 % HR et 15,6° à 29,4° C) et ne doit pas être posé dans une pièce munie d’un siphon de sol ou d’une pompe de puisard. Le revêtement de RevWood Premier peut être posé au-dessus du niveau du sol, au niveau du sol ou au-dessous du niveau du sol. On recommande fortement de procéder à un test d’humidité afin de déterminer si le sous-plancher est sec. Si vous utilisez un test d’humidité au chlorure de calcium pour béton (conformément à la norme ASTM 1869), la teneur en eau ne doit pas excéder 2,27 kg/92,9 m2/24 h. Si vous utilisez une sonde sur place, elle doit être inférieure à 80 % HR (conformément à la norme ASTM F2170’). La teneur en eau des sous-planchers de bois ne doit pas excéder 12 %.
Les conditions requises pour l’emplacement, y compris l’humidité relative et du sous-plancher, doivent être maintenues durant toute la durée de vie de l’installation de revêtement de sol. Le revêtement de sol RevWood Premier s’installe comme un plancher flottant et nécessite l’utilisation de moulures en T dans les cas suivants : entrée de porte de moins de 0,81 m (32 po), changement de direction dans une entrée de porte (peu importe sa largeur) et pièce d’une longueur ou d’une largeur de 15,24 m (50 pi) ou plus. Ne pas empêcher le mouvement du revêtement à l’aide de colle, de clous, de vis, de quincaillerie ou de toute autre forme d’obstruction.
*Ce produit doit être installé conformément aux instructions d’installation illustrées aux pages 1-3.
Site and Material Preparation / Préparation de l’emplacement et du matériel
Site and Material Preparation
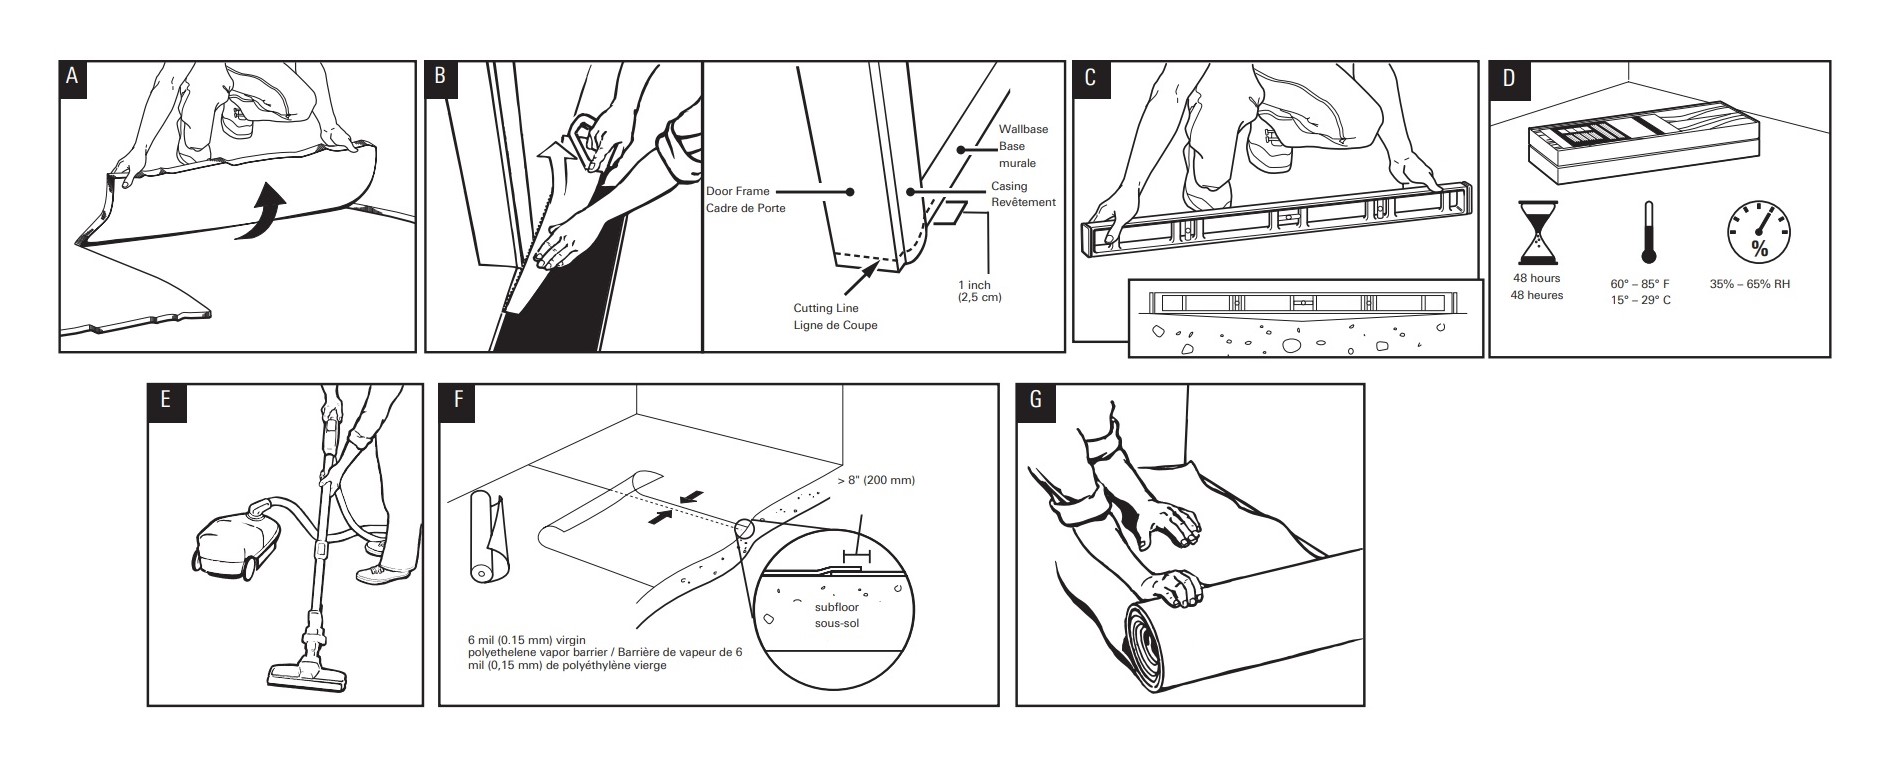
A) Remove previously installed floor coverings, pad or underlayment. Remove wood flooring installed over concrete. Do not remove existing floor coverings unless certain they are asbestos-free.
B) Undercut door frame and wall base. Slide the flooring at least 1/4” underneath the door frame and wall base. Also, leave a concealed 3/8” minimum expansion space under each.
C) Sand peaks in subfloor and fill depressions with floor leveling compound to ensure floor flatness is with 3/16” per 10-foot span.

D) Acclimate unopened product before installation. If there is no time for acclimation, there should be no more than a difference of 25° F and 20% relative humidity between the stocking/transportation environment of the flooring and the final installation environment of the flooring.
E) Clean debris from subfloor before installation.
F) For concrete subfloors, install a 6mil polyethylene vapor barrier with overlapped seams of 8” or more.
G) For planks without attached underlayment, install over single layer of underlayment no more than 2.0mm thick appropriate for RevWood Premier floors.
Préparation de l’emplacement et du matériel
A) Retirez tout tapis et sous-tapis. Retirez également tout plancher de bois posé directement sur le béton. Ne retirez aucun produit qui contient des fibres d’amiante.
B) Entaillez le cadre de porte et la plinthe. Faites glisser le revêtement d’au moins 0,64 cm sous le cadre et la plinthe. Laissez un jeu dissimulé d’au moins 0,95 cm pour la dilatation sous le cadre et les plinthes.
C) Éliminez toute bosse sur le sous-plancher et remplissez les affaissements à l’aide d’un produit de nivellement de plancher afin de ne laisser aucune irrégularité de plus de 0,47 cm par section de 3,04 m.
D) Avant d’installer le produit, laissez-le s’acclimater dans son emballage. Si vous n’avez pas le temps de le faire, il ne devrait pas avoir une différence de température et d’humidité égale ou inférieure à 3,9 °C et 20% entre l’environnement d’entreposage ou de transport et celui où le plancher sera posé.
E) Nettoyez les débris du sous-plancher avant de commencer l’installation.
F) Posez un pare-vapeur dont les joints dépassent d’au moins 20,32 cm si votre sous-plancher et en béton.
G) Si vos planches n’ont pas de sous-couche préfixée, posez-les sur une seule sous-couche qui convient aux revêtements de sol RevWood Premier.
Flooring Installation / Pose du revêtement de sol

1) Before installing flooring, read all installation instructions. Any questions please call Technical Services at 888-387-9881.
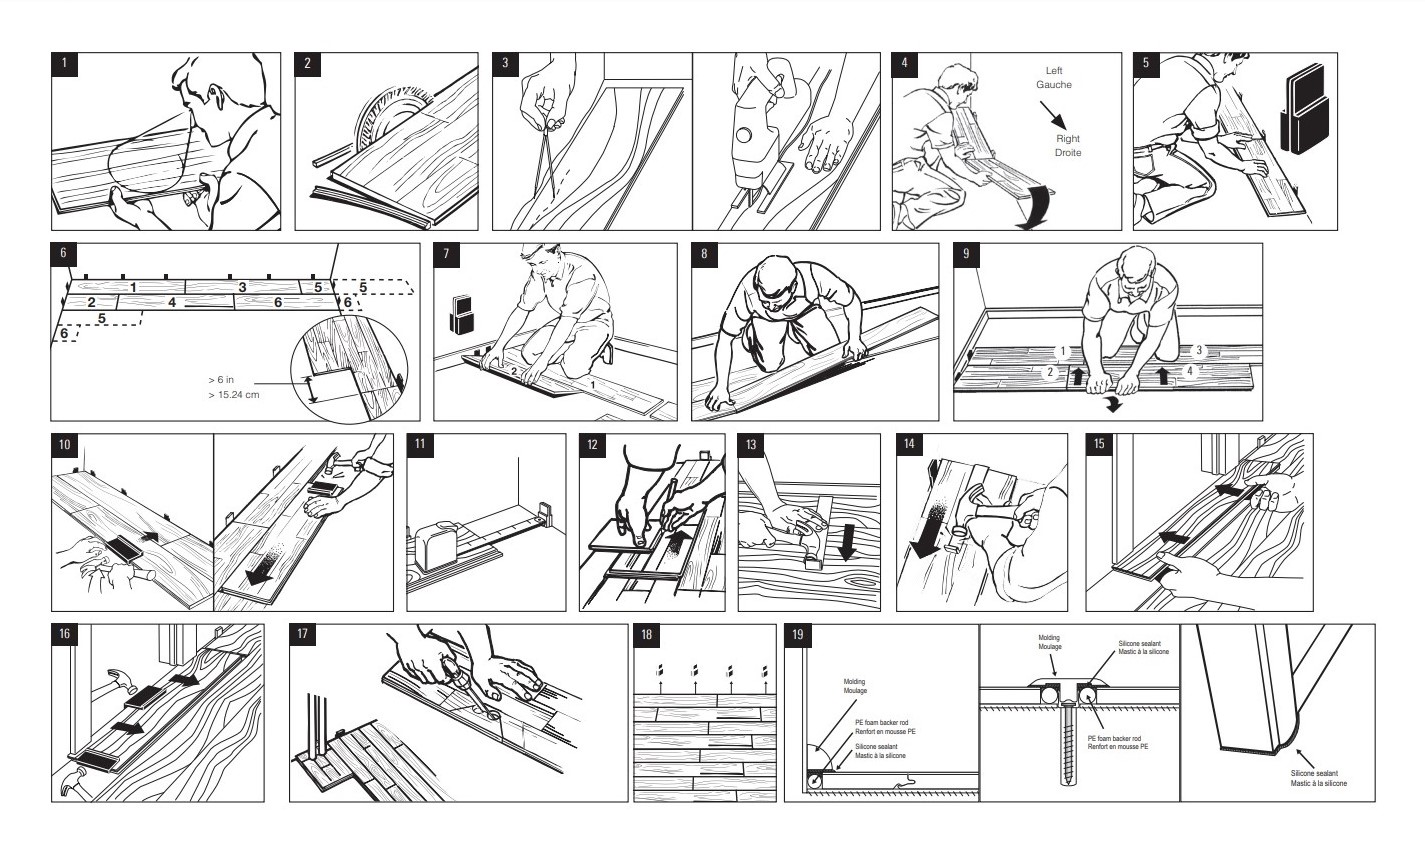
2) Inspect each plank. The flooring should be installed by blending planks from several cartons at the same time to ensure good color and shade mixture throughout the installation.
3) For the first row along straight walls, remove the tongue on all long side joints and on the short side of the first plank only.
4) For uneven walls, trace contour on tongue side of plank and cut.
5) Assemble the first-row tongue side toward wall. Insert the end tongue into the end groove and rotate downward to assemble. Keep the planks aligned and the joints closed.
6) Align thick side of two spacers to equal 3/8” to maintain consistent perimeter expansion space.
7) Provide a 3/8” space for expansion on all sides. First piece must be at least 8” long. Start new rows with pieces trimmed from previous row. Ensure a minimum 8-12”joint stagger.
8) At a slight angle, insert the tongue of plank two into the groove of plank one until the RevWood Premier edges meet, and then rotate down until the joints lock.
9) Join the short end of the plank first. There will be a gap on the long side joints when the plank is rotated down.
10) Raise the outside edge of the plank upward approximately 1”. Maintain this angle as you push the plank in, until the RevWood Premier edges meet.
Installation Tip: Place a carton of planks across the end of the row being installed to keep installed planks in place during installation.
11) Alternate Tap Method: Align the tongues into the grooves of the long and short sides of the planks. Install the long side first with a tapping block by tapping lightly along the long side until the joint is closed tightly. Then tap the end using the tapping block into a locked position. Note: Uneven tapping or use of excessive force may damage the joint.
12) Ensure there will be a 3/8” gap (after the joint is closed) to the wall for expansion.
13) For the last row, align the plank to be used on top of the second to last row. Using a full width plank as a spacer, trace wall contour and cut plank.
14) For the last row, install the long side tongue into the groove with the end joint aligned. Using a pull bar and hammer, work evenly along the length of the plank and lightly tap the joint closed.
15) After tapping the long side joint closed, tap the short side closed, using a tapping block or a pull bar.
Installation Under Doorway Frames
16) Slide plank under pre-cut door frame.
17) Tap the long side joint closed first. Then tap the end joint closed.
Installation Around Fixed Objects (Such as Pipes)
18) Allow 3/8” expansion space around pipes or other vertical or fixed objects.
Finishing the Installation
19) Remove all spacers.
20) The entire perimeter of the installation must be sealed with the WetProtect molding system in accordance with the installation instructions. For sections where the WetProtect molding system cannot be used, seal the perimeter with 100% silicone sealant, as follows. DO NOT use acrylic sealant.
- First fill all expansion spaces with 3/8” compressible PE foam backer rod and cover with silicone sealant.
- Prior to installing the moldings, apply silicone sealant to the portion of the molding or transition that will contact directly with flooring surface.
- Install moldings and immediately wipe away any excess silicone sealant.
- Apply silicone at connections to doorframes or any other fixed objects.
Care and Cleaning
Place felt floor protectors under legs of moveable furniture. Chair casters should be rubber – not plastic or metal. Place walk-off mats at entrances. Dust mop as primary cleaning method. Occasionally wet mop with water only, using a well wrung out mop; DO NOT pour liquid directly on floor or use an excessively wet mop that will puddle or leave moisture standing on the floor. If needed, use a solution of 1 cup of vinegar per gallon of water OR 1/3 cup non-sudsing ammonia per gallon of water. DO NOT use detergents, abrasive cleaners, soaps, waxes or polishes. Use correct hard surface vacuum tools. DO NOT use rotating beater bars, floor scrubbers, jet mops, buffers or similar products. Wipe up spills immediately. DO NOT allow topical moisture to remain on the floor longer than the time specified in the product warranty.
Pose du revêtement de sol
1) Inspectez chaque planche. Les planches installées doivent provenir de plusieurs boîtes à la fois afin d’assurer une belle harmonie des couleurs etdes teintes sur l’ensemble du plancher.
2) Pour installer la première rangée le long d’un mur droit, retirez la languette de tous les joints du côté long ainsi que la languette du joint du petit côté de la première planche uniquement.
3) Si les murs sont irréguliers, tracez le contour sur le côté des languettes des planches et effectuez la coupe.
4) Installez la première rangée, le côté languette vers le mur. Insérez la languette de l’extrémité dans la rainure de l’extrémité et faites pivoter les planches vers le bas pour les emboîter. Les planches doivent demeurer alignées et les joints serrés.
5) Deux espaceurs, côté épais contre côté épais = 0,95 cm.
6) Laissez un espace de 0,95 cm de chaque côté pour l’expansion. La première pièce doit mesurer au moins 20,32 cm de long. Commencez chaque nouvelle rangée avec une pièce de la rangée précédente qui a été coupée. Utilisez des pièces d’au moins 30,48 cm.
7) Insérez la languette de la deuxième planche à un léger angle dans la rainure de la première planche jusqu’à ce que les bordures de RevWood Premier se touchent, et ensuite faites pivoter vers le bas jusqu’à ce que les joints s’emboîtent.
8) Fixez le petit côté de la planche en premier. Il y aura un écart entre les joints du côté long lorsque vous ferez pivoter la planche vers le bas.
9) Soulevez le rebord extérieur de la planche d’environ 2,5 cm. Maintenez cet angle pendant que vous poussez la planche jusqu’à ce que les bordures de RevWood Premier se touchent. Faites pivoter la planche vers le bas jusqu’à ce qu’elle s’emboîte. Répétez ces étapes pour effectuer l’installation.
10) Conseil pour l’installation : Placez une boîte de planches au bout de la rangée que vous installez afin que les planches déjà installées demeurent en place.
Installation Tip: Place a carton of planks across the end of the row being installed to keep installed planks in place during installation.
11) Autre méthode d’ajustement : Alignez les languettes dans les rainures des côtés long et court de la planche. Posez d’abord le côté long en frappant légèrement sur celui-ci au moyen d’un bloc de battage jusqu’à ce que le joint soit serré. Frappez ensuite l’extrémité au moyen du bloc d’ajustement afin d’emboîter la planche
Remarque : Ajustez correctement les planches et n’exercez pas de pression excessive afin d’éviter d’endommager le joint.
12) Assurez-vous de laisser un espace de 0,95 cm (après le serrage des joints) avec le mur pour permettre l’expansion des planches.
13) Alignez les planches de la dernière rangée par-dessus celles de l’avant-dernière rangée. Utilisez une planche de pleine largeur comme espaceur afin de tracer le contour du mur. Effectuez la coupe.
14) Pour installer la dernière rangée, placez la languette du long côté dans la rainure en prenant soin d’aligner le joint d’extrémité. À l’aide d’une barre d’ajustement et d’un marteau, travaillez de façon uniforme le long de la planche et frappez légèrement pour serrer le joint.
15) Après avoir frappé du côté long pour serrer le joint, frappez du côté court à l’aide d’un bloc d’ajustement ou d’une barre d’ajustement.
Pose sous les cadres de porte
16) Glissez la planche sous le montant précoupé de la porte.
17) Frappez d’abord le joint du côté long pour le serrer. Frappez ensuite le joint d’extrémité pour le fermer.
Pose autour d’objets fixes (comme des tuyaux)
18) Laissez un espace de 0,95 cm autour des tuyaux ou d’autres objets fixes pour l’expansion des planches.
Terminer l’installation
19) Retirez toutes les cales d’espacement.
20) Créez un joint étanche en appliquant un mastic à la silicone flexible sur tout le périmètre de l’installation. N’UTILISEZ PAS de scellant acrylique.
- Remplissez d’abord tous les espaces de dilatation avec un boudin mousse en polyéthylène compressible de 0,95 cm (3/8 po) et recouvrez le tout de mastic à la silicone.
- Avant d’installer les moulures, appliquez le mastic à la silicone sur la partie de la moulure ou de la bande de transition qui sera en contact direct avec la surface du revêtement de sol en RevWood Plus.
- Installez les moulures et essuyez immédiatement tout excédent de mastic.
- Appliquez le mastic à la silicone à la jonction des cadres de porte ou de tout autre objet fixe.
Instructions pour l’entretien et le nettoyage
Placez des patins en feutre sous les pieds des meubles à déplacer. Privilégiez les roulettes de chaise en caoutchouc à celles en plastique ou en métal. Utilisez des paillassons aux entrées. Nettoyez principalement la surface avec une vadrouille sèche. Utilisez une vadrouille humide uniquement à l’occasion, en prenant soin de bien l’essorer; NE VERSEZ PAS de liquide directement sur le revêtement et n’utilisez pas une vadrouille sans l’avoir préalablement essorée afin d’éviter la formation de flaques ou la présence d’humidité sur la surface. Au besoin, ajoutez 250 ml (1 tasse) de vinaigre OU 85 ml (1/3 tasse) d’ammoniaque à 3,78 l (1 gallon) d’eau. N’UTILISEZ PAS de détergents, de solvants, de nettoyants abrasifs, de savons, de cires, ni de produits de polissage. Utilisez les outils pour aspirateur appropriés pour les surfaces dures. N’UTILISEZ PAS de brosses batteuses, de brosses à récurer, d’appareils à vapeur, de vadrouilles à jet ou de produits similaires. Essuyez immédiatement tout déversement. NE laissez PAS l’humidité demeurer sur la surface du plancher plus longtemps que la durée précisée dans la garantie du produit.
IMPORTANT HEALTH NOTICE FOR MINNESOTA RESIDENTS ONLY:
THESE BUILDING MATERIALS EMIT FORMALDEHYDE. EYE, NOSE, AND THROAT IRRITATION, HEADACHE, NAUSEA AND A VARIETY OF ASTHMA-LIKE SYMPTOMS, INCLUDING SHORTNESS OF BREATH, HAVE BEEN REPORTED AS A RESULT OF FORMALDEHYDE EXPOSURE. ELDERLY PERSONS AND YOUNG CHILDREN, AS WELL AS ANYONE WITH A HISTORY OF ASTHMA, ALLERGIES OR LUNG PROBLEMS, MAY BE AT GREATER RISK. RESEARCH IS CONTINUING ON THE POSSIBLE LONG-TERM EFFECTS OF EXPOSURE TO FORMALDEHYDE. REDUCED VENTILATION MAY ALLOW FORMALDEHYDE AND OTHER CONTAMINANTS TO ACCUMULATE IN THE INDOOR AIR. HIGH INDOOR TEMPERATURES AND HUMIDITY RAISE FORMALDEHYDE LEVELS. WHEN A HOME IS TO BE LOCATED IN AREAS SUBJECT TO EXTREME SUMMER TEMPERATURES, AN AIR-CONDITIONING SYSTEM CAN BE USED TO CONTROL INDOOR TEMPERATURE LEVELS. OTHER MEANS OF CONTROLLED MECHANICAL VENTILATION CAN BE USED TO REDUCE LEVELS OF FORMALDEHYDE AND OTHER INDOOR AIR CONTAMINANTS. IF YOU HAVE ANY QUESTIONS REGARDING THE HEALTH EFFECTS OF FORMALDEHYDE, CONSULT YOUR DOCTOR OR CALL THE LOCAL HEALTH DEPARTMENT.
For detailed product specifications, please contact Technical Services at 888-387-9881.
For service under this warranty please notify your retailer in writing. Be sure to describe the specific problem and to include a copy of your invoice. Your retailer will take appropriate action, including notifying Mohawk, if necessary.
Mohawk® Flooring is manufactured and distributed by Unilin North America LLC550 Cloniger DriveThomasville, NC 27360
AVIS DE SANTÉ IMPORTANT À L’ATTENTION DES RÉSIDENTS DU MINNESOTA:
CERTAINS DES MATÉRIAUX UTILISÉS POUR LA CONSTRUCTION DE CETTE DEMEURE (OU CES MATÉRIAUX DE CONSTRUCTION) ÉMETTENT DU FORMALDÉHYDE. DES IRRITATIONS AUX YEUX, AU NEZ ET À LA GORGE, DES MAUX DE TÊTE, DES NAUSÉES ET DIFFÉRENTS SYMPTÔMES SEMBLABLES À CEUX DE L’ASTHME, COMME L’ESSOUFFLEMENT, ONT ÉTÉ RAPPORTÉS À LA SUITE D’UNE EXPOSITION AU FORMALDÉHYDE. LES PERSONNES ÂGÉES ET LES JEUNES ENFANTS, DE MÊME QUE TOUTE PERSONNE AVEC DES ANTÉCÉDENTS D’ASTHME, D’ALLERGIES OU DE PROBLÈMES PULMONAIRES, PEUVENT ÊTRE PLUS VULNÉRABLES. LES RECHERCHES SE POURSUIVENT SUR LES EFFETS POTENTIELS À LONG TERME D’UNE EXPOSITION AU FORMALDÉHYDE. UNE VENTILATION RÉDUITE PEUT PERMETTRE AU FORMALDÉHYDE ET À D’AUTRES CONTAMINANTS DE S’ACCUMULER DANS L’AIR INTÉRIEUR. LES TEMPÉRATURES ÉLEVÉES À L’INTÉRIEUR AUGMENTENT LES NIVEAUX DE FORMALDÉHYDE. LORSQU’UNE MAISON EST SITUÉE DANS UNE RÉGION SUJETTE À DES TEMPÉRATURES ESTIVALES EXTRÊMES, LES NIVEAUX DE TEMPÉRATURE INTÉRIEURE PEUVENT ÊTRE CONTRÔLÉS À L’AIDE D’UN SYSTÈME DE CLIMATISATION. D’AUTRES MÉTHODES DE VENTILATION MÉCANIQUE CONTRÔLÉE PEUVENT ÊTRE UTILISÉES POUR RÉDUIRE LES NIVEAUX DE FORMALDÉHYDE ET D’AUTRES CONTAMINANTS DE L’AIR INTÉRIEUR.SI VOUS AVEZ DES QUESTIONS À PROPOS DES EFFETS DU FORMALDÉHYDE SUR LA SANTÉ, CONSULTEZ VOTRE MÉDECIN OU LES SERVICES DE SANTÉ LOCAUX.
Pour connaître les caractéristiques détaillées du produit, veuillez communiquer avec les services techniques au 888 387-9881, option 3.
Pour toute réclamation au titre de la garantie, veuillez aviser votre détaillant par écrit. Assurez-vous de décrire le problème en question et de joindre une copie de votre facture. Votre détaillant prendra les mesures appropriées, y compris le signalement à la Mohawk, si nécessaire.
Les revêtements de sol Mohawk® sont fabriqués et distribués par Unilin North America LLC550 Cloniger DriveThomasville, NC 27360


